在《十字军之王III》中,可以修改游戏地图。这包括编辑陆地、海洋、河流和省份。关于修改标题,请看 title modding.
高程图
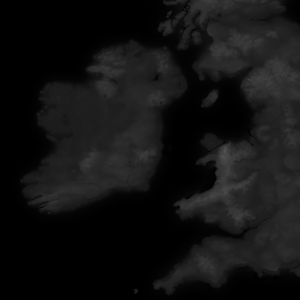
高程图是每张地图的基础,定义了非纸质地图的整体形状。高度图用灰度图像表示,其中黑色是可能的最低海拔,白色是可能的最高海拔。
创建高度图
对于现实世界的地点,美国航天局通过 "Blue Marble project"项目的地形图部分向公众提供详细的高度图。
虚构的高程图通常是使用软件组合创建的,通常是Photoshop或GIMP等图像编辑器和World Machine或Gaea等地形生成软件。
主高程图文件
高度图在"[mod]/map_data/heightmap.png "中找到,并且必须保存为16位灰度图像。
高度图的尺寸必须符合"[mod]/map_data/heightmap.heightmap "中定义的 "original_heightmap_size"。
其他heightmap文件
除了 "heightmap.png "之外,还有两个重要的自动生成高度图文件,"indirection_heightmap.png "和 "packed_heightmap.png"。当高度图被重新打包并保存时,CK3地图编辑器会创建这两个文件。
。
重新打包
当主heightmap.png被改变时,你必须在地图编辑器中 "重新打包 "以使河流、边界和标题等符合新的heightmap。如果你有任何问题,如东西似乎不 "服从 "高度图,第一个解决问题的步骤应该是重新打包。
River map
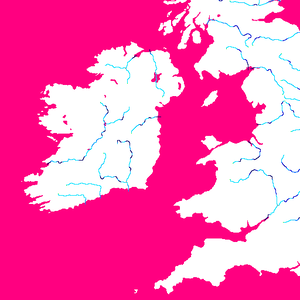
河流地图是一个定义海岸和河流的特殊文件,它既被地形引擎用来在地图上绘制河流,也用来定义军队过河的位置。它不用于通航的河流或其他水体。
'不正确创建的河流地图将导致CTD。它们必须是索引的RGB图像,具有非常特定的调色板;在创建河图时,防止崩溃的最好方法是开始使用游戏的原始河图,在"[CK3目录]/game/map_data/rivers.png "中找到。除了原始颜色索引中的颜色外,任何其他颜色,包括反锯齿或透明,都会导致CTD。
了解河图颜色
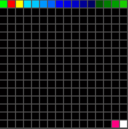
河流地图应该是有颜色索引的,这意味着它们是用特殊编码保存的,表示只能使用某些特定的颜色。
每种颜色都有特定的含义,由游戏引擎转化为好看的河流。
- 00ff00(纯绿色)表示河流系统的源头。
- #ff0000(纯红色)表示一条支流与主河相通。
- #fffc00(纯黄色)表示分河。
- #ff0080(洋红色)表示海洋、湖泊和通航河流。
- #ffffff(白色)表示陆地。
其余颜色为浅蓝色到深蓝色的渐变,蓝色越深,河流越宽。
像素完美
。每个河流像素必须与不超过2个其他河流像素正交相邻,分割和连接必须与不超过3个其他河流像素相邻。两个像素宽的河流''将导致崩溃,仅用对角线像素连接的河流将无法渲染。
绘制程序
。
你可以认为CK3的河道绘制算法基本上是以三种特殊像素颜色(红、黄、绿)中的一种作为起点来绘制河段,其中绿色的那个是整个河系的起点。每条河段的一端应该有三种像素类型中的一种,另一端则没有。这意味着一条河流不能像现实生活中经常发生的那样,离开母体又重新加入母体。河段边上的红色和黄色像素与这个限制是分开的,因为它们会生成新的河段。三种河流类型中的每一种也决定了它生成的河段的流向。绿色和黄色像素使河流远离它们,红色像素使河流流向它们。
河源
每条河流系统应该只有一个源像素;这意味着如果一条河流有任何支流,这些支流不应该有绿色的源像素。
水下河道技巧
河流地图上的粉色和白色只供你参考,它们都有一个共同的代号,那就是不属于河流。因此,你可以像在陆地上一样轻松地通过水画出河流,只是不会被看出来。当一条河流在湖泊或大海中结束时,建议将河流延续几个像素进入粉色区域(甚至完全穿过小湖泊,如果它在另一边再次出口的话),这样CK3可以更好地理解河流末端的方向性。
如果您有复杂的河流系统,也要穿过湖泊,这也是很有帮助的,因为它为您提供了一个额外的工具来协调现实生活中河流属性和CK3引擎功能之间的差异。
省地图
。
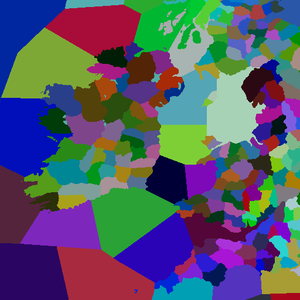
省地图定义了男爵领地和海区。在行省地图中,每个行省/海区都以独特的颜色来定义。就像河流地图一样,行省地图必须避免反锯齿和透明度。
省地图不能定义郡、公国、王国或帝国。要定义郡、公国、王国和帝国,你需要在landed_titles文件夹中定义它们。
创建标题
创建头衔的方法是将省地图中的颜色与男爵、郡、公国、王国和帝国的定义联系起来。这个过程包括以下步骤。
- 创建一个省地图来定义各个男爵领地。
- 通过"[mod]/map_data/definition.csv "省地图中的RGB来识别男爵领地。
- 在"[mod]/common/landed_titles/"中的新文件中定义你的头衔继承权。
- 在"[mod]/localization/[language]/"中新建一个文件,为你的标题创建本地化。
界定男爵制
要把省地图的颜色变成可用的男爵领地,你必须在 "definition.csv"文件中定义它们。
男爵领地定义的格式是
   [ID];[RED];[GREEN];[BLUE];[Barony Name];x。
   # 例如:
   2333;128;183;194;PARIS;x;
'ID必须是有顺序的,否则你的游戏会崩溃。
   # 这将工作。
   1;42;3;128;CAMELOT;x;
   2;84;6;1;AVALON;x。
   3;126;9;129;TINTAGEL;x;

   # 这将导致崩溃。
   1;42;3;128;CAMELOT;x;
   4;84;6;1;AVALON;x。
   19;126;9;129;TINTAGEL;x;
土地所有权
土地所有权和法律上的等级必须在"[mod]/common/landed_titles/"中定义。基本结构如下。
名称(e_empire_tier,k_kingdom_tier等)只是举例,"color "可以是任何你喜欢的RGB值,但 "color2 "是静态的,有效的大写字母是郡名。任何一个层级都可以包含下一个下层级的多个(比如1个帝国有5个王国)。
男爵国在游戏中出现的顺序与文件中的顺序相同。即第一个将是默认的首都。引擎将使用"[mod]\history\provinces@_title.txt "中设置的首都男爵的文化和宗教来确定其郡的文化和宗教在任何设定的日期。
 e_empire_tier = {
       color = { 0 0 0 }
       color2 = { 255 255 255 }
       capital = c_county_tier

       k_kingdom_tier = {
           color = { 0 0 0 }
           color2 = { 255 255 255 }
           capital = c_county_tier

           d_duchy_tier = {
               color = { 0 0 0 }
               color2 = { 255 255 255 }
               capital = c_county_tier

               c_county_tier = {
                   color = { 0 0 0 }
                   color2 = { 255 255 255 }

                   b_barony_tier = {
                       color = { 0 0 0 }
                       color2 = { 255 255 255 }
                       province = id (defined in map_data/definition.csv)
                   }
               }
           }
       }
   }
地图定位器
一旦定义了男爵领地,就可以定义其四个主要定位对象的位置(position)。这将告诉引擎每个海瓦的举起的军队(船的位置)的位置,以及地图上每个男爵的守备建筑、军队、军队战斗和攻城武器对象的位置。这四个定位器的位置分别在building_locators.txt, combat_locators.txt, player_stack_locators.txt and siege_locators.txt,这些文件可以在"[mod]/gfx/map/map_object_data/"中找到。
在这些文件中,每个barony都由一个实例来表示,在这个实例中可以设置地图对象的位置、旋转和比例。 例如,下面的代码定义了一个单一的barony的定位器,ID=1,标准尺寸,地图上的坐标为x=2000,y=1000。
   instances={
       {
           id=0
           position={ 2000.000000 0.000000 1000.000000 }
           rotation={ 0.000000 0.000000 0.000000 1.000000 }
           scale={ 1.000000 1.000000 1.000000 }
       }
   }
这些数值,特别提出了军队在海陆两省的位置,用于定义部队移动的路径指示。在任何时候,都可以使用游戏中地图编辑器中的地图对象编辑器来微调这些对象的位置、旋转和比例。
要注意的是,如果一个mod的定位器文件有任何严重的问题,error.log应该会显示在"[用户]/[文档]/Paradox Interactive/Crusader Kings III/generated "文件夹中创建了四个文件(一般是持有建筑、举起的军队、军队战斗和攻城武器定位器文本文件)。您可以将这些文件复制到您的mod的"[mod]/gfx/map/map_object_data/"文件夹中,替换旧文件并重新启动游戏中的地图编辑器。
自动推移
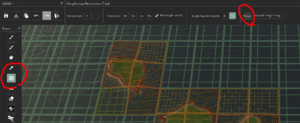
游戏中的地图编辑器包含了一个自动推移工具(由对象放置模式上的骰子按钮表示),允许用户自动生成陆地省份的对象定位文件,并在给定省份内随机测试新的对象位置。要使用它,编辑器应该使用省选择工具,选择它想要随机化的省,然后点击推移工具按钮。然后,地图编辑器应该尝试在所有选定的省份上生成每个默认对象。
如果有任何无效的位置(例如由于缺乏有效的产卵空间而在该省的区域外产卵的对象),受影响的省份将在地图上以红色条纹交叉。要解决这个问题,用户就应该选择任何被红色条纹划过的省份,然后通过再次点击自动推移按钮尝试新的随机有效位置,或者手动将任何无效的对象拖入该省份。
游戏中的地图编辑器还允许用户对自动推移工具的产卵设置进行微调。为了方便使用自动推移工具进行随机放置,用户可以减少物体的碰撞框,或者调整每个物体之间的最小和最大距离。用户应该注意的是,默认攻城引擎的设置是经过优化的,这样攻城引擎的动画就能正确地与持有建筑对象进行交互。
连接
男爵领地可以通过两种方式连接:拥有相邻的像素,或者在"[mod]/map_data/adjacencies.csv "中定义连接。
"adjacencies.csv "中的条目采用的格式是。
   ID From;ID To;Type;ID Through;start_x;start_y;stop_x;stop_y;Comment
   #For example:
   1527;1526;river_large;629;948;2791;-1;-1;London-Southwark
   -1;-1;;-1;-1;-1;-1;-1;
- ID From、ID To和ID Through都是ID。
在 "definitions.csv "中找到的。
- ID From和ID To是男爵领地;ID Through是大海或可航行的河流。
- 类型为 "海 "或 "大河"。
- start_x start_y是军队在 "ID From "部落中 "出发 "的坐标(x,y)。
- stop_x和stop_y是一个军队在 "ID To "部落中 "登陆 "的坐标(x,y)。
- start_x、start_y、stop_x和stop_y都可以使用"-1 "来代替实际坐标,这将默认为军队在该部落的正常位置。
- 保留文件末尾的"-1;-1;;-1;-1;-1;-1;-1;"。
Creating a Map with a Custom Resolution
Note: width and height are the new widths and height you are setting for your mod
- common/defines/00_defines.txt:
   WORLD_EXTENTS_X # Should be: map width - 1
   WORLD_EXTENTS_Z # Shoud be: map height - 1
- common/defines/graphics/00_graphics.txt
   PANNING_WIDTH # However far you want the player to be able to pan left to right. Panning to the edge would mean this is equal to map width
   PANNING_HEIGHT # However far you want the player to be able to pan up and down. Panning to the edge would mean this is equal to map height
- /gfx/map/surround_map/surround_mask.dds # Size should be: (width x height) * 1/2
- /gfx/map/surround_map/surround_fade.dds # Size should be: (width x height) * 1/8
- /gfx/map/terrain/ # All files in this that have _mask (63 as of 1.3) or .tga (2 as of 1.3) in the name need to be resized TO: (width x height)
* flatmap.dds # Size should be: (width x height) * colormap.dds # Size should be: (width x height) * 1/4 * detail_intensity.tga # Size should be: (width x height) * detail_index.tga # Size should be: (width x height) * ..._mask.png # Size should be: (width x height)
- /gfx/map/water/flowmap.dds # Size should be: (width x height) * 1/4
- /gfx/map/water/foam_map.dds # Size should be: (width x height) * 1/8
- /gfx/map/water/watercolor_rgb_waterspec_a.dds # Size should be: (width x height) * 1/2
- /map_data/heightmap.png # Size should be: (width x height) Ensure that this is in RGB format and not RGBA. If you get a white fog it might be because the heightmap was exported as RGBA. To fix this, you need to delete the alpha layer
- /map_data/provinces.png # Size should be: (width x height) # Note, game will load even if the dimensions on this are wrong
- /map_data/rivers.png # Size should be: (width x height)
- /map_data/indirection_heightmap.png # Size should be: (width x height) * 1/32
- /map_data/heightmap.heightmap
original_heightmap_size # Should be { width height }
- /content_source/map_objects/masks # All files in this that have _mask (21 as of 1.0) need to be resized TO: (width x height) * 1/2
How to import the heightmap
If you are struggling to get the custom heightmap to load or repack (this can be especially problematic with larger heightmaps) try the following procedure. This works as of 1.1.3:
- Copy the vanilla indirection_heightmap.png and packed_heightmap.png over to the mod's map_data directory
- Delete indirection_heightmap.png and packed_heightmap.png in the vanilla folder
- Load the map editor and repack the map. The repacked map files should be in the vanilla map_data directory
- Copy the new indirection_heightmap.png and packed_heightmap.png from the vanilla directory to the mod's map_data directory
- For Steam users, verify the integrity of the game cache to redownload the vanilla indirection_heightmap.png and packed_heightmap.png files
Frequently asked questions
Why can't I scroll all the way to the right?
You have to open common/defines/graphics/00_graphics.txt and set PANNING_WIDTH = 8192 or whatever the equivalent pixel width of your map is.
Why can't I use the auto-nudge (dice) button to place my buildings and locators?
Due to a bug, you'll need to have those defined before you can auto nudge. Luckily the game generates them for you.
Copy all of the files in:
C:\Users\[user]\Documents\Paradox Interactive\Crusader Kings III\generated
Paste them into:
\gfx\map\map_object_data
| 文档 | Effects • 触发器 • 修正 • 作用域 • 变量 • 数据类型 • 本地化 • 可定制的本地化 |
| 脚本 | AI • 剧本 • 角色 • 效果指令 • 内阁 • 文化 • 决议 • 宗族 • 事件 • 政体 • 历史 • 地产 • 生活方式 • 军队 • 宗教 • Story cycles • 头衔 • 特质 |
| 地图 | 地图 • 地形 |
| 图形 | 3D模型 • Exporters • 界面 • Coat of arms • Graphical assets • Fonts • Particles • Shaders • Unit models |
| 音频 | Music • Sound |
| 其他 | 控制台指令 • 校验码 • 模组结构 • Troubleshooting |
