| 第29行: | 第29行: | ||
'''不正确创建的河流地图将导致CTD''。它们必须是索引的RGB图像,具有非常特定的调色板;在创建河图时,防止崩溃的最好方法是开始使用游戏的原始河图,在"[CK3目录]/game/map_data/rivers.png "中找到。除了原始颜色索引中的颜色外,任何其他颜色,包括反锯齿或透明,都会导致CTD。 | '''不正确创建的河流地图将导致CTD''。它们必须是索引的RGB图像,具有非常特定的调色板;在创建河图时,防止崩溃的最好方法是开始使用游戏的原始河图,在"[CK3目录]/game/map_data/rivers.png "中找到。除了原始颜色索引中的颜色外,任何其他颜色,包括反锯齿或透明,都会导致CTD。 | ||
=== | === 了解河图颜色 === | ||
[[File:River map color table.png|128px|thumb|left]] | [[File:River map color table.png|128px|thumb|left]] | ||
河流地图应该是有颜色索引的,这意味着它们是用特殊编码保存的,表示只能使用某些特定的颜色。 | |||
每种颜色都有特定的含义,由游戏引擎转化为好看的河流。 | |||
#00ff00 (纯绿色)表示河流系统的源头。 | |||
* #ff0000 ( | * #ff0000( 纯红色) 表示一条支流与主河相通。 | ||
* #fffc00 ( | * #fffc00( 纯黄色) 表示分河。 | ||
* #ff0080 | * #ff0080 (洋红色)表示海洋、湖泊和通航河流。 | ||
* #ffffff | * #ffffff (白色)表示陆地。 | ||
其余颜色为浅蓝色到深蓝色的渐变,蓝色越深,河流越宽。 | |||
=== Pixel perfect === | === Pixel perfect === | ||
2020年11月17日 (二) 13:42的版本
In Crusader Kings III, it is possible to mod the game map. This includes editing land, seas, rivers and provinces. For modding titles, see title modding.
高程图
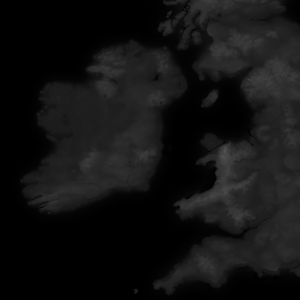
高程图是每张地图的基础,定义了非纸质地图的整体形状。高度图用灰度图像表示,其中黑色是可能的最低海拔,白色是可能的最高海拔。
创建高度图
对于现实世界的地点,美国航天局通过 "Blue Marble project"项目的地形图部分向公众提供详细的高度图。
虚构的高程图通常是使用软件组合创建的,通常是Photoshop或GIMP等图像编辑器和World Machine或Gaea等地形生成软件。
主高程图文件
高度图在"[mod]/map_data/heightmap.png "中找到,并且必须保存为16位灰度图像。
高度图的尺寸必须符合"[mod]/map_data/heightmap.heightmap "中定义的 "original_heightmap_size"。
其他heightmap文件
除了 "heightmap.png "之外,还有两个重要的自动生成高度图文件,"indirection_heightmap.png "和 "packed_heightmap.png"。当高度图被重新打包并保存时,CK3地图编辑器会创建这两个文件。
。
重新打包
当主heightmap.png被改变时,你必须在地图编辑器中 "重新打包 "以使河流、边界和标题等符合新的heightmap。如果你有任何问题,如东西似乎不 "服从 "高度图,第一个解决问题的步骤应该是重新打包。
River map
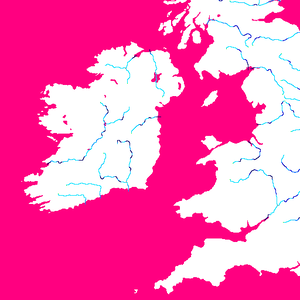
河流地图是一个定义海岸和河流的特殊文件,它既被地形引擎用来在地图上绘制河流,也用来定义军队过河的位置。它不用于通航的河流或其他水体。
'不正确创建的河流地图将导致CTD。它们必须是索引的RGB图像,具有非常特定的调色板;在创建河图时,防止崩溃的最好方法是开始使用游戏的原始河图,在"[CK3目录]/game/map_data/rivers.png "中找到。除了原始颜色索引中的颜色外,任何其他颜色,包括反锯齿或透明,都会导致CTD。
了解河图颜色
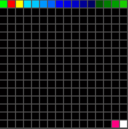
河流地图应该是有颜色索引的,这意味着它们是用特殊编码保存的,表示只能使用某些特定的颜色。
每种颜色都有特定的含义,由游戏引擎转化为好看的河流。
- 00ff00(纯绿色)表示河流系统的源头。
- #ff0000(纯红色)表示一条支流与主河相通。
- #fffc00(纯黄色)表示分河。
- #ff0080(洋红色)表示海洋、湖泊和通航河流。
- #ffffff(白色)表示陆地。
其余颜色为浅蓝色到深蓝色的渐变,蓝色越深,河流越宽。
Pixel perfect
Each river pixel must be orthogonally adjacent to no more than 2 other river pixels, and splits and joins must be adjacent to no more than 3 other river pixels. Two-pixel wide rivers will cause a crash, and rivers connected using only diagonal pixels will fail to render.
绘制程序
。
你可以认为CK3的河道绘制算法基本上是以三种特殊像素颜色(红、黄、绿)中的一种作为起点来绘制河段,其中绿色的那个是整个河系的起点。每条河段的一端应该有三种像素类型中的一种,另一端则没有。这意味着一条河流不能像现实生活中经常发生的那样,离开母体又重新加入母体。河段边上的红色和黄色像素与这个限制是分开的,因为它们会生成新的河段。三种河流类型中的每一种也决定了它生成的河段的流向。绿色和黄色像素使河流远离它们,红色像素使河流流向它们。
River source
There should only be a single source pixel for each river system; this means if a river has any tributaries, those tributaries should not have a green source pixel.
Underwater river tricks
The pink and white colors on the river map are only for your reference; they both share the code meaning of not being rivers. Therefore, you can draw rivers through water as easily as land, they simply won't be visible. When a river ends in a lake or sea, it is recommended to continue the river a few pixels into the pink zone (or even entirely through small lakes, if it exits again on the other side) so that CK3 has a better understanding of directionality at the end of the river.
This is also helpful it you have complicated river systems which also go through lakes, as it provides you an additional tool reconcile differences between the properties of the river in real life and the capabilities of the CK3 engine.
Province map
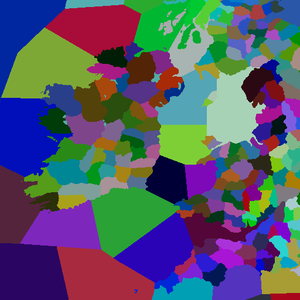
The province map defines baronies and sea regions. Each barony/sea region is defined by being of a unique color in the province map. Like the river map, a province map must avoid antialiasing and transparency.
The province map does not define counties, duchies, kingdoms, or empires. To Define Counties, Duchies, Kingdoms and Empires you need to define them in landed_titles folder
Creating titles
Creating titles is done by linking the colors in the province map to definitions of baronies, counties, duchies, kingdoms, and empires. The process includes the following steps:
- Create a province map to define individual baronies
- Identify baronies by the RGB found in the province map in "[mod]/map_data/definition.csv"
- Define your title heirarchy in a new file in "[mod]/common/landed_titles/"
- Create localisations for your titles in a new file in "[mod]/localization/[language]/"
Defining baronies
To turn the colors of the province map into usable baronies, you must define them in the "definition.csv" file.
The format of barony definitions is:
   [ID];[RED];[GREEN];[BLUE];[Barony Name];x;
   # For example:
   2333;128;183;194;PARIS;x;
IDs must be sequential, or your game will crash.
   # This will work:
   1;42;3;128;CAMELOT;x;
   2;84;6;1;AVALON;x;
   3;126;9;129;TINTAGEL;x;

   # This will cause a crash:
   1;42;3;128;CAMELOT;x;
   4;84;6;1;AVALON;x;
   19;126;9;129;TINTAGEL;x;
Landed titles
Landed titles and the de jure hierarchy have to be defined in "[mod]/common/landed_titles/". The basic structure is below.
The names (e_empire_tier, k_kingdom_tier, etc.) are just examples, "color" can be any RGB value you like, but "color2" is static and valid capitals are county titles. Any tier can contain multiple of the next lower tier (e.g. 5 kingdoms in 1 empire).
Baronies appear in the game in the same order as in the file. I.e. the first one will be the default capital. The engine will use the capital baronie's culture and religion set in "[mod]\history\provinces@_title.txt" to determine its county's culture and religion at any set date.
   e_empire_tier = {
       color = { 0 0 0 }
       color2 = { 255 255 255 }
       capital = c_county_tier

       k_kingdom_tier = {
           color = { 0 0 0 }
           color2 = { 255 255 255 }
           capital = c_county_tier

           d_duchy_tier = {
               color = { 0 0 0 }
               color2 = { 255 255 255 }
               capital = c_county_tier

               c_county_tier = {
                   color = { 0 0 0 }
                   color2 = { 255 255 255 }

                   b_barony_tier = {
                       color = { 0 0 0 }
                       color2 = { 255 255 255 }
                       province = id (defined in map_data/definition.csv)
                   }
               }
           }
       }
   }
Map locators
Once baronies have been defined, the locations (positions) of their four main locator objects can be defined. This will tell the engine where to place each sea tile's raised army (ship placement), as well as the holding building, raised army, army combat and siege weapon objects for each barony on the map. The positions of these four locators are defined in the building_locators.txt, combat_locators.txt, player_stack_locators.txt and siege_locators.txt files respectively, which can be found in "[mod]/gfx/map/map_object_data/".
Within these files, each barony is represented by an instance where the position, rotation and scale of the map objects can be set. For example, the following code defines the locator for a single barony with ID = 1 at standard size and co-ordinates of x = 2,000 and y = 1,000 on the map:
   instances={
       {
           id=0
           position={ 2000.000000 0.000000 1000.000000 }
           rotation={ 0.000000 0.000000 0.000000 1.000000 }
           scale={ 1.000000 1.000000 1.000000 }
       }
   }
These values, specially raised army's position for both sea and land provinces, are used to define troop movement pathfinding. At any time, the position, rotation and scale of these objects can be finessed using the Map Objects Editor in the in-game map editor.
Be mindful that if there is any serious problem with a mod's locator files, errors.log should indicate that four files (generally holding buildings, raised army, army combat and siege weapon locator text files) have been created in the "[user]\[documents]\Paradox Interactive\Crusader Kings III\generated" folder. You can then copy those over to your mod's "[mod]/gfx/map/map_object_data/" folder, replace the old files and re-start the in-game map editor.
Auto nudge
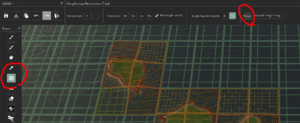
The in-game map editor contains an auto nudge tool (represented by a dice button on the object placement mode) that allows users to automatically generate land province's object locator files and randomly test new object positions within a given province. To use it, an editor should use the province selection tool, select which province's it wants to randomize, and then click the nudge tool button. The map-editor should then try to spawn each of the default objects on all selected provinces.
In case there are any invalid positions (such as objects spawned outside the province's area due to lack of valid spawning space), affected provinces will be crossed by red stripes on the map. To fix the issue, the user should then either select any red-stricked provinces and try a new random valid position by clicking the auto nudge button again or drag any invalid objects into the province manually.
The in-game map editor also allows users to fine-tune the auto nudge tool's spawning settings. To facilitate random placement with the auto nudge tool, an user may reduce the collision box of objects or tweak the minimal and max distances between each object. Users should be aware that the default siege engine's settings are optimized so that the siege engine's animation properly interacts with the holding building object.
Connections
Baronies can be connected in two ways: having adjacent pixels, or having a connection defined in "[mod]/map_data/adjacencies.csv".
Entries in "adjacencies.csv" take the format:
   ID From;ID To;Type;ID Through;start_x;start_y;stop_x;stop_y;Comment
   #For example:
   1527;1526;river_large;629;948;2791;-1;-1;London-Southwark
   -1;-1;;-1;-1;-1;-1;-1;
- ID From, ID To, and ID Through are all ID
s found in "definitions.csv"
- ID From and ID To are baronies; ID Through is a sea or navigable river.
- Type is either "sea" or "river_large"
- start_x start_y are the (x, y) coordinates from which an army 'embarks' in the "ID From" barony.
- stop_x and stop_y are the (x, y) coordinates to which an army 'lands' in the "ID To" barony.
- start_x, start_y, stop_x, and stop_y can all use "-1" instead of actual coordinates, which will default to wherever the normal army placement is in that barony.
- Preserve the "-1;-1;;-1;-1;-1;-1;-1;" at the end of the file.
Creating a Map with a Custom Resolution
Note: width and height are the new widths and height you are setting for your mod
- common/defines/00_defines.txt:
   WORLD_EXTENTS_X # Should be: map width - 1
   WORLD_EXTENTS_Z # Shoud be: map height - 1
- common/defines/graphics/00_graphics.txt
   PANNING_WIDTH # However far you want the player to be able to pan left to right. Panning to the edge would mean this is equal to map width
   PANNING_HEIGHT # However far you want the player to be able to pan up and down. Panning to the edge would mean this is equal to map height
- /gfx/map/surround_map/surround_mask.dds # Size should be: (width x height) * 1/2
- /gfx/map/surround_map/surround_fade.dds # Size should be: (width x height) * 1/8
- /gfx/map/terrain/ # All files in this that have _mask (63 as of 1.3) or .tga (2 as of 1.3) in the name need to be resized TO: (width x height)
* flatmap.dds # Size should be: (width x height) * colormap.dds # Size should be: (width x height) * 1/4 * detail_intensity.tga # Size should be: (width x height) * detail_index.tga # Size should be: (width x height) * ..._mask.png # Size should be: (width x height)
- /gfx/map/water/flowmap.dds # Size should be: (width x height) * 1/4
- /gfx/map/water/foam_map.dds # Size should be: (width x height) * 1/8
- /gfx/map/water/watercolor_rgb_waterspec_a.dds # Size should be: (width x height) * 1/2
- /map_data/heightmap.png # Size should be: (width x height) Ensure that this is in RGB format and not RGBA. If you get a white fog it might be because the heightmap was exported as RGBA. To fix this, you need to delete the alpha layer
- /map_data/provinces.png # Size should be: (width x height) # Note, game will load even if the dimensions on this are wrong
- /map_data/rivers.png # Size should be: (width x height)
- /map_data/indirection_heightmap.png # Size should be: (width x height) * 1/32
- /map_data/heightmap.heightmap
original_heightmap_size # Should be { width height }
- /content_source/map_objects/masks # All files in this that have _mask (21 as of 1.0) need to be resized TO: (width x height) * 1/2
How to import the heightmap
If you are struggling to get the custom heightmap to load or repack (this can be especially problematic with larger heightmaps) try the following procedure. This works as of 1.1.3:
- Copy the vanilla indirection_heightmap.png and packed_heightmap.png over to the mod's map_data directory
- Delete indirection_heightmap.png and packed_heightmap.png in the vanilla folder
- Load the map editor and repack the map. The repacked map files should be in the vanilla map_data directory
- Copy the new indirection_heightmap.png and packed_heightmap.png from the vanilla directory to the mod's map_data directory
- For Steam users, verify the integrity of the game cache to redownload the vanilla indirection_heightmap.png and packed_heightmap.png files
Frequently asked questions
Why can't I scroll all the way to the right?
You have to open common/defines/graphics/00_graphics.txt and set PANNING_WIDTH = 8192 or whatever the equivalent pixel width of your map is.
Why can't I use the auto-nudge (dice) button to place my buildings and locators?
Due to a bug, you'll need to have those defined before you can auto nudge. Luckily the game generates them for you.
Copy all of the files in:
C:\Users\[user]\Documents\Paradox Interactive\Crusader Kings III\generated
Paste them into:
\gfx\map\map_object_data
| 文档 | Effects • 触发器 • 修正 • 作用域 • 变量 • 数据类型 • 本地化 • 可定制的本地化 |
| 脚本 | AI • 剧本 • 角色 • 效果指令 • 内阁 • 文化 • 决议 • 宗族 • 事件 • 政体 • 历史 • 地产 • 生活方式 • 军队 • 宗教 • Story cycles • 头衔 • 特质 |
| 地图 | 地图 • 地形 |
| 图形 | 3D模型 • Exporters • 界面 • Coat of arms • Graphical assets • Fonts • Particles • Shaders • Unit models |
| 音频 | Music • Sound |
| 其他 | 控制台指令 • 校验码 • 模组结构 • Troubleshooting |
